Tested: DaVinci Resolve 12
Can something that’s free be useful? That’s the intriguing question raised by the launch of the new DaVinci Resolve 12 software package, so we set out to find exactly what it has to offer
Price: Free
www.blackmagicdesign.com
Let me start by asking you a question. How many times have you walked into a shop, picked up a beautifully crafted professional tool that will do everything you need it to do, and have then taken it to the shopkeeper and asked ‘how much will this cost?’, only to be told ‘don’t worry, that’s free’. I’m guessing never.
Your suspicions would be naturally aroused, and you would either assume that the claims your chosen tool is ‘professional’ have been overstated and that, in reality, it’s a mere husk of the real tool that will do the job properly, or that what you’ve picked up is, in fact, just a demonstration model. If you want the real thing then it’s going to cost you a shed load of money.
I’m posing this intriguing conundrum because this is a scenario that’s just arisen in real life, with the launch of the latest version of Blackmagic Design’s (BMD) DaVinci Resolve software. On paper at least this is the bargain of the century: a formidable editing and colour-grading package that’s available to download free of charge, and the upgrade it’s received has made it look even more attractive.
It’s now a fully-fledged non-linear editor with a complete user interface overhaul and a host of new features, and BMD also suggest that it offers ‘the most powerful colour correction toolset available’. So, the obvious question is: what’s the catch?
Before answering that I should mention that there is also a paid-for version available known as Resolve 12 Studio, and this comes in at around £650, a price that still compares well with competing software packages. The main distinction between the paid-for and free application is that with the free version you don’t have the ability to output media larger than UHD scale and neither do you get some very helpful noise reduction tools, which, on some productions, could be critical.
The other big difference, and one that will mainly affect bigger production houses rather than individual filmmakers, is that the free version of Resolve doesn’t give you the ability to share one project concurrently across multiple seats. The paid-for version comes with a massively powerful function that allows a facility or production company to edit on one seat, grade and colour-correct on another, do preparation for both of these tasks on a third and output media from a fourth all at the same time. For those who need this facility the purchase price should not be an issue.
However, what the free version of Resolve 12 does offer will cover most of the functions that the average film editor will be looking for and, once you’ve mastered the software, you should easily be able to deliver outstanding professional finished work to your clients time after time.

So, apart from the fact that it’s a free download, why might you consider using Resolve 12 as your regular editor? Well for a start it has a world-class toolset for colour correction and, if you envisage using those tools to finish your job, there will be clear workflow benefits to not having to ‘round trip’ from other editing tools. For a start there will be no subtle settings lost or inaccurately interpreted through the XML transfer between the apps, while there will also be no time lost getting the media reinstated/relinked in Resolve and prepared for the grade.
Just to bring home how good the colour correction toolset is in Resolve 12, and why it’s industry-standard practice to aim to finish work in the Resolve application, it’s worth remembering that this software is the tool of choice used to grade most Hollywood feature films. It’s enabled me as a colourist to achieve grading results for all of my clients that are far beyond what I, or they, thought might be possible.
It also has an incredible set of dedicated tools, ranging from a powerful planner perspective tracker through to amazing keying/masking functionality, that enables you never to have to compromise. Importantly with Resolve Live as part of the application, all these tools can be available on set during the production process, allowing you to take advantage of its brilliant colour-balancing, LUT management, media management – and now editing tools – as you’re acquiring your media.
However, the question still remains; why edit in Resolve rather than, say, any of the other seriously good editing tools that are out there, such as Adobe Premiere, Avid or FCPX?
Both BMD and Adobe saw Apple’s decision to re-invent the editing process and introduce their trackless editor FCPX, as an opportunity to gain new users from the huge pool of existing editors using Apple’s FCP7 software who were used to a track-based editing environment. If any of these old FCP7 users take just a cursory glance at Resolve 12 it would reveal to them that it, like Premier CC, is at a certain level simply an homage to the fundamental strengths of that FCP7 tool.
However, unlike Adobe, BMD has shown itself far more willing to embrace some of the enhanced functionality that was added when Apple developed FCPX. Sure they based the default keyboard shortcuts for Resolve 12 on those used in FCP7 (although it is possible to map your keyboard shortcuts to emulate editing software from any of the major manufacturers), but they also implemented the optical-flow pixel-morphing slow-motion capability just like that found in FCPX.
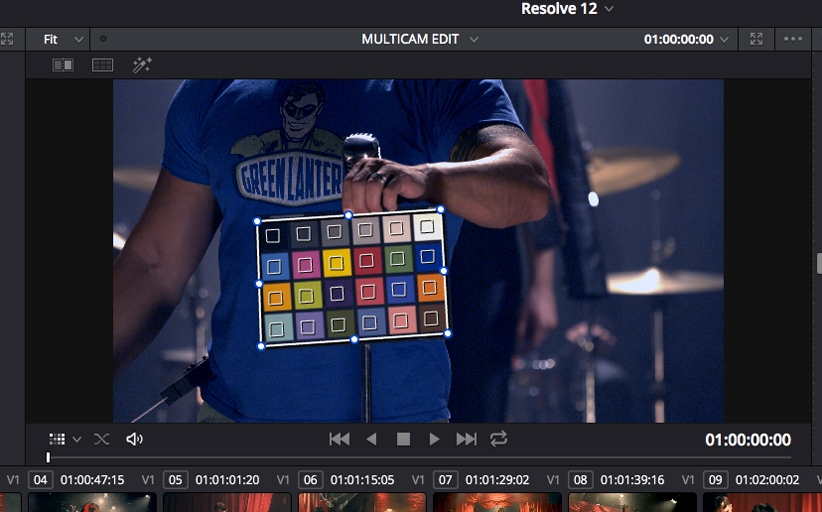
They also added an inspector interface just like FCPX, which allows you to manipulate and keyframe all the video and audio parameters. The software has the ability to multi-camera edit and to synchronise all the angles you want to edit with using the audio waveform to form the clip alignment. It also has the ability to create smart bins allowing you to organise your media incredibly efficiently, just like FCPX.
Ticking all the boxes that a modern editing tool might need with all the sophisticated trimming capabilities that are also required, Resolve 12 also offers users the ability to perform a classic mix on their audio channels using the familiar ‘rubber-banding’ key-framing technique to adjust levels and, if required, to export an AAF of their audio mix to Avid Protools, the industry standard audio finishing tool.
Also chasing Adobe’s strengths on the graphic side, BMD is said to be racing to integrate its recently purchased, and highly sophisticated, graphics generating application Fusion into the Resolve software as well. This will effectively take me back to the era when I first started working on non-linear disk-based editing, where all the tasks required in the creative process could be achieved in one application rather than many.
The verdict
So, quite a package, but what’s in it for BMD? What really is the catch? Well, I can only imagine that it’s the classic ‘puppy-dog’ sale strategy. You fall in love with the product so much that when it comes to buying your next camera, monitor or converter, you will look no further than BMD, in the sure knowledge it will work smoothly and seamlessly with the Resolve software that’s at the heart of your facility.

Top 5 DaVinci Resolve Features
1. Professional shortcut based trimming functionality
2. Project level configuration of editing-parameters, raw camera format LUTS and playback performance.
3. In-context curves and key-frame interpolation options
4. Industry standard overwrite, insert, replace and fit-to-fill speed change editing operations (with incredibly fast optical-flow analysis)
5. Creating and decomposing compound clip workflows
Things that could improve
– It would be good to be able to make ‘adjustment layers’ in the editor to control editing-based timeline effects as an alternative to compounding clips.
– You have the usual set of standard transitions but have to buy OFX plug-ins to get to advanced transitions or effects in the editor or, indeed, in the colour correction area.
– Although the software has competent tilting tools there is room for improvement. Modifying on-screen and seeing them update live would be easier.
– One small deficiency that I’m assured will be implemented soon is the ability to paste-insert, ie. paste one or more clips into the timeline and have the software make new space for the pasted clips. At the moment I can ripple cut, ie. cut one or more clips out of the timeline, and have the space in which they existed ripple close in one operation. If I can perform a ripple cut and a paste insert, they go a long way to making the software behave as if it has magnetic timeline functionality.
Specification
System requirements:
Apple Mac OS X 10.10.3 Yosemite and CUBA Driver version 7.0.36 or Windows 8.1 Pro 64-bit with SP1.
Plus: 16GB system memory recommended, BlackMagic Design Desktop Video 10.4.1 or later, RED Rocket-X Driver 2.1.19.0 or later and firmware 1.3.19.7 or later, RED Rocket Driver 1.4.26.0 and firmware 1.1.17.3 or later
How it rates
Features 8/10
A really strong package and has most of what you need
Performance 8/10
Good integrated tools including built-in colour correction
Handling 8/10
Easy to get to grips with and a straightforward design
Value for money 10/10
Obviously a full score and it’s a real bargain
Pro Moviemaker Rating: 8.5/10
Pros: A remarkable free package that’s worth trying
Cons: Not as established an editor as its rivals