Learn About LUTS
Our guide provides practical answers and hints for first-time LUT users…
Words: Laura Jeacocke
It doesn’t take much time after you start getting serious about shooting movies to come across the abbreviation LUT. Some think of them as magic wands that will change your footage from vanilla-looking to something much more cinematic. But it’s not as simple as that.
LUT stands for ‘Look Up Table’, a set of values used to manipulate the colours of an image. They’re often perceived to be way more complex than they actually are – really they’re just a mathematically precise way of changing the RGB values of an image through the hue, saturation and brightness. Simply put, apply a LUT to your footage and it’ll look different.
Used by movie professionals for a long time, LUTs are becoming increasingly popular among all filmmakers, and it’s important to have an awareness of what they can be used for and when they should be used. There are 1D and 3D LUTs. Useful for the basics, 1D LUTs aren’t great when dealing with complex grading, but 3D LUTs map all the colour values together in one 3D cube. In short, 3D LUTs are much better.
LUTs have the ability to hugely enhance the final look of your film, saving time and helping you to achieve results you might not otherwise get. Think of them as a professional Instagram filter. They can be used to fine-tune exposure, emulate all sorts of 35mm film stock or apply specific ‘looks’ to your footage.
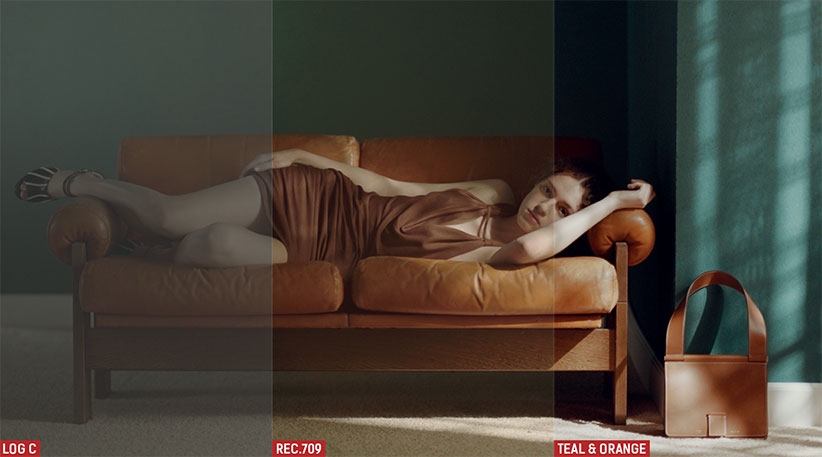
You can use them on multiple sequences, which gives your project a consistent look throughout, and they’re able to make Log or flat footage come to life by adding contrast or style. They also convert footage back into the standard Rec.709 colour space, and give editors the ability to apply complex colour grades and imitate the looks of major blockbusters.
Many professionals shoot their footage in Log – it gives more scope for editing after because it retains the maximum amount of highlight and shadow detail. However, Log images vary massively from camera to camera, and can be extremely difficult to judge both when shooting and in post.
If you are shooting Log, then the image in the viewfinder will be flat and lacking in contrast and saturation. Some cameras, like many Sony cinema cams, need you to overexpose by up to two stops for maximum quality, so the image you see on the screen or monitor is very different to what your final film will look like, and therefore it’s pretty difficult to expose correctly.
But load a LUT into monitors or your camera and the viewfinder gives you a preview that is a lot closer to what the final image will look like after colour grading. As this doesn’t bake in the LUT to your recording (it’s just reflected on what you see on the monitor) you get the added flexibility of being able to change the look entirely in post.

“Some think of LUTs as magic wands – but it’s not as simple as that”

IMAGES: A LUT isn’t a one-size-fits-all magic wand that works on all shots in all situations. Experiment and you could find a look that works for you.

After shooting, the first step is to apply a normalisation LUT that can transform your footage into its intended basic look. They work best when they match with what it was shot on – say you shot using Sony’s S-Log2; applying a normalisation LUT like S-Log2 to Rec.709 is a good idea.
This should work and give you a standard look, but often the colour, saturation and exposure can be way out – you might need to tweak the settings, or just ignore the LUT and do a basic grade yourself.
The best thing to do is experiment with colour correcting both before and after applying a LUT. There are arguments for both sides and it really depends on whether or not you like the overall look the LUT has on your image. If you want to use the LUT by itself, colour correct before. If you want to make further adjustments to the LUT, colour correct after.
Either way, colour correction is crucial as LUTs are designed for properly exposed and white-balanced images – if you’re using supplemental lighting you need to make sure the white balance settings in-camera are matched to the lights.
Now comes the fun bit – using creative or colour grading LUTs. For example, if you want to recreate a certain 35mm film stock look, apply the corresponding 3D LUT and your image will have the desired grade. These can then be further adjusted, like toning down the overall tint or making secondary corrections limited to certain areas of the image only. Don’t be afraid to edit on top of a LUT if you don’t like the way it has altered your footage.
There are hundreds of creative LUTs you can load into your NLE. When it comes to choosing, and the question of whether to use free versions or buy some, you have to take a step back and question what it is you’re actually looking for; you should try free LUTs first, to test that they work on your system but also in case you happen to stumble on the perfect one. Consider the genre or mood of your film, if there are specific tones you want to highlight or a particular look you desire. Knowing how your film should look gives you a much better understanding of what LUTs you need to use, or if you ought to make one yourself. Once you’ve figured out what it is you’re after and what you want to create, it’s just about finding a LUT that matches your requirements and can transform your grade to rival that of the biggest blockbuster.
Where To Get The Hot LUTS You Lust After
There are so many LUTs available, for little or no cost. Websites like lutify.me/free-luts are often good starting points. They offer some free LUTs but have a ‘basic’ package for those starting to explore grading, a ‘standard’ package and a ‘professional’ package for full control, the latter being around £50/$67. Their LUTs also fully support Raw and non-Raw still images for both Lightroom and Capture One.
If you want to recreate a particular look from an iconic film, check out Motion Picture Film LUTs; if you’re after an unprocessed, 35mm-film stock look, ImpulZ has a wide range on offer.
Lots of software supports LUTs but most tend to need some kind of utility or plug-in to do so. For example, DaVinci Resolve can add a downloaded LUT to its colour management profile, allowing you to access it through the ‘3D Luts’ tab in nodes; for Premiere Pro you can access them in the Lumetri colour tab. The latest version of Apple’s Final Cut Pro X has now added native LUT support for the first time, so you don’t need any other plug-ins.