Audio recording for interviews
One of the most common filming scenarios involves an interview, and it’s crucial in these situations that you get the sound right. Audio expert Tom Flint shows how to get professional results
When filming a presenter talking to camera, or setting up an interview involving multiple people, getting a flawless audio track is vital. The nature of this kind of job means that the on-site audio will be exactly what’s used in the final edit and most of the time there won’t be much that can be done at the post-production stage to fix problems that occur during recording. As for the filmmaker’s trick of overdubbing better vocals and sound effects in the comfort of the editing suite, that’s just not going to be an option!
Bearing all this in mind you have to select the best microphones for the situation you’re facing, and these need to be placed so they capture the cleanest and clearest audio.
Of course, no two interviews are the same and many factors will play a part in your gear selection. Cost will be a major consideration for most, but other things matter too, such as the location you work in (indoors or outdoors), the amount of movement that’s taking place during the filming and the number of people speaking.
Let’s kick off with the simplest approach, which will suit those of you working solo. Every camera is capable of recording audio from its on-board microphone, but better results can be had by using a higher-quality mic that mounts on the camera’s hotshoe and plugs into its ‘mic in’ mini-jack socket.
The RØDE Stereo VideoMic X is a good example of just such a product. It’s cradled in a shock mount to reduce audio-wrecking vibrations, and has several controls for adjusting mic sensitivity and the EQ of its output. It also amplifies the signal using good-quality preamps, thereby allowing the user to turn down the inferior ones in the camera. Finally, it has a heart-shaped pick-up pattern (known as cardioid), which is good for capturing more than one interviewee, speaker or presenter.
The problem with using a mic in this way is that the camera it sits on will be positioned to get the best shot, and that’s often not the ideal place from which to capture audio. For this reason, products like the Mic X can be mounted on a boom pole, which brings us to the next option.
Boom mics
Boom set-ups enable the filmmaker to position their mics more accurately, but a second pair of hands is usually needed to swing the boom pole, so it’s really only an option if you have an assistant with you. Generally speaking, boom mics have either a hypercardioid or super-cardioid pick-up pattern, which makes them very directional. In other words, they’re designed to pick up what’s directly in front of them and relatively little from the sides.
When pointed at someone speaking, for example, they will pick up their dialogue rather than the surrounding noise. That said, I’ve used directional mics for close-miking actors inside double-glazed houses and have still clearly picked up bird song outside, so their directionality has its limits. Working outdoors can be even more problematic, with passing helicopters and distant cars making their way onto the soundtrack. A good pair of closed-back headphones is essential for monitoring the relative level of such things.
One particular type of commonly used mic is called a shotgun (or interference tube) mic. They are popular for outdoor work but not recommended for use in tight and reverberant indoor spaces, or in situations where there’s lots of moving about. In many situations a non-shotgun hypercardioid mic will do the job just as well.
In terms of technique, holding the pole in such a way that it can be manoeuvred to stay with the action is a skill that needs to be developed, but aiming and positioning the mic is a simple concept. Being directional it should be angled towards the person speaking and kept as close to them as possible without getting it in shot.
When more than one person is being covered, a swing of the mic to point a little more towards the speaker at the appropriate moment is usually enough to do the job. It’s also often possible to capture a couple of people speaking with the same mic position if they are close enough together and the mic is backed off just a little.

Recording more than two people
On some jobs it will be necessary to capture the voices of several people at once. One solution would be to hire more than one boom operator, but another is to use personal lavalier or ‘tie clip’ mics as they are sometimes known. These are the ultimate ‘no hands’ choice and when placed correctly will faithfully capture its wearer’s vocals, no matter what position the subject moves to, or when they choose to speak.
Clipping the mic on the outside of clothing will result in the clearest sound and it’s pretty easy to do, but in some circumstances mics can’t be in shot and they will have to be hidden inside clothing. When the person is dressed in a shirt, tie, or jacket there are many hiding places for the mic, but things get a little trickier if your subject is wearing a dress or T-shirt.
The most important thing is to make sure clothing, or even body hair, doesn’t rub on the mic. Even a touch of the mic cable can translate into a noticeable sound, so engineers usually support the mic’s capsule with pads of gaffer tape or custom-made covers and sticky pads.
When filming outside there is the added problem of wind noise, so it’s not uncommon to see a presenter wearing a scarf which both protects the mic and conceals it from view. A windshield is also needed outdoors.
While some of this sounds fiddly, the good news is that lav mics usually have an omnidirectional pattern, which means they pick up sound from all around. This allows them to be dangled upside down or placed at a funny angle with no significant loss of clarity. They also tend to have a high-frequency lift to compensate for when they’re sat inside a windshield or muffled by clothes.
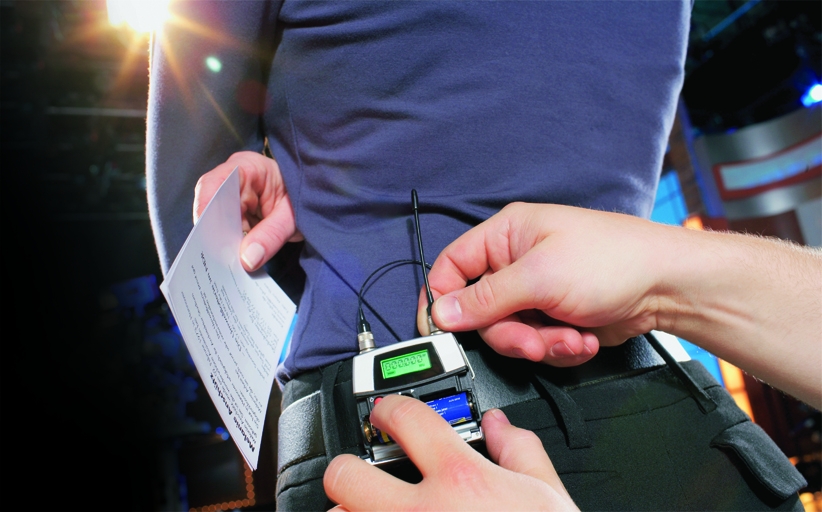
Lavalier mics are usually wired to a belt-pack transmitter, which sends its signal wirelessly to a receiver. The receiver then plugs into the audio recorder or mixer or directly into the camera itself. The common problem with budget wireless systems is that they’re prone to interference and can only operate over certain distances, so it’s worth paying a little extra to get a product that will do the job you need it to do.
Mic quality matters too, of course. A single industry standard Sanken COS-11 mic costs around £270, which sounds like a lot when compared to brands costing as little as £15, but mics such as these are designed to resist nasty things like interference and sweat (an important feature when worn under clothing), and they capture far better-quality audio too.
The final suggestion is appropriate in situations where there is a group sat around a table and the room isn’t overly reverberant. For this scenario, a single omnidirectional studio mic could be placed at an equal distance from all those involved, either in front of the speakers or, if it needs to be out of shot, hanging from above like a boom mic. It’s a very easy way to record everyone in one go, but it doesn’t leave you with many options at the mix stage.
Recording the sound
The final consideration concerns what to use to record the audio. One option is to feed it directly into the camera, and many wireless systems go for this solution, designing the receiver mount to fit on the camera’s hotshoe with its signal fed into the camera via a short lead.
There are also mics (like the RØDE VideoMic X) that attach to the camera in the same way, not to mention the new breed of tripod-mounting preamp interfaces that amplify the signal from one or more external mics and then send it to both the camera and any connected recording device. Take the Beachtek DXA-SLR Ultra: it powers the mics, amplifies and distributes the signal, and provides display and headphone monitoring. All three options suit the solo filmmaker.
My personal budget preference is to work with a handheld recorder like the Zoom H4n, H5 or H6, or Tascam’s DR-40 or DR-44WL. I like these types of recorder because they are small and provide excellent preamps, metering and audio settings options. Some accept up to four input signals and it’s even possible to record six simultaneously with the H6.
It’s a good idea to keep each mic feed on a different track so if there is a problem with one, it can be edited without ruining the others. Synchronisation shouldn’t be an issue if the same recorder is used to record all the mics, and the audio recorded by the camera will function as an excellent guide track when it comes to lining them up with the pictures.
Ultimately what you go for all depends on the budget you’re working within, what kind of jobs you’re undertaking and how many members of crew are involved. Sift through the options and pick out the one that’s right for you, and you’ll find that your interview audio technique will soon become second nature.
More information:
www.woodenfish.co.uk