Edit creative video titles
Posted on May 11, 2020 by Lee Renwick
Creating good-looking video titles can seem like an impossible task even for skilled editors, but it’s never been easier with these simple methods.
In any type of video, titles can be make or break. To many filmmakers’ frustration, it’s hard to avoid an amateurish look, and whether your video is creative, commercial or anything in between, that’s a descriptor you want to avoid at all costs.
There are a few very simple methods to make your video titles stand out in all the right ways and we’ll be covering three of them in this feature, but there are a few important considerations to bear in mind throughout all of them.
Font, size and placement are all still of the utmost importance. Try to ensure any text compliments the whole video – you don’t just want something that looks good in isolation. Depending on your editing software, you’ll likely have many options readily available, but there’s a world of downloadable fonts online, so they’re well worth a look.
Finally, as with many elements of filmmaking, simplicity is often best when it comes to titles, especially if you’re doing it all yourself.
Animated titles
We’re not talking about any complex animation in this technique – as we said, all of these methods are relatively quick and easy. Here, we’re talking about keyframes. We’ll be referring to Premiere Pro, but any software with a keyframe option will be able to produce very similar results, though specific commands may vary slightly.
There are many options when it comes keyframe animation, but this combination will produce nice, subtle look, which will work well with virtually any style of text.
The first thing you’ll need to do is add your text, so hit T to select the Text tool, then click in the Program panel and type. Next, you’ll likely want to tweak the font, position and size of your text, and the best way to do this is with Essential Graphics. If this panel isn’t visible, click the Window menu and select it.
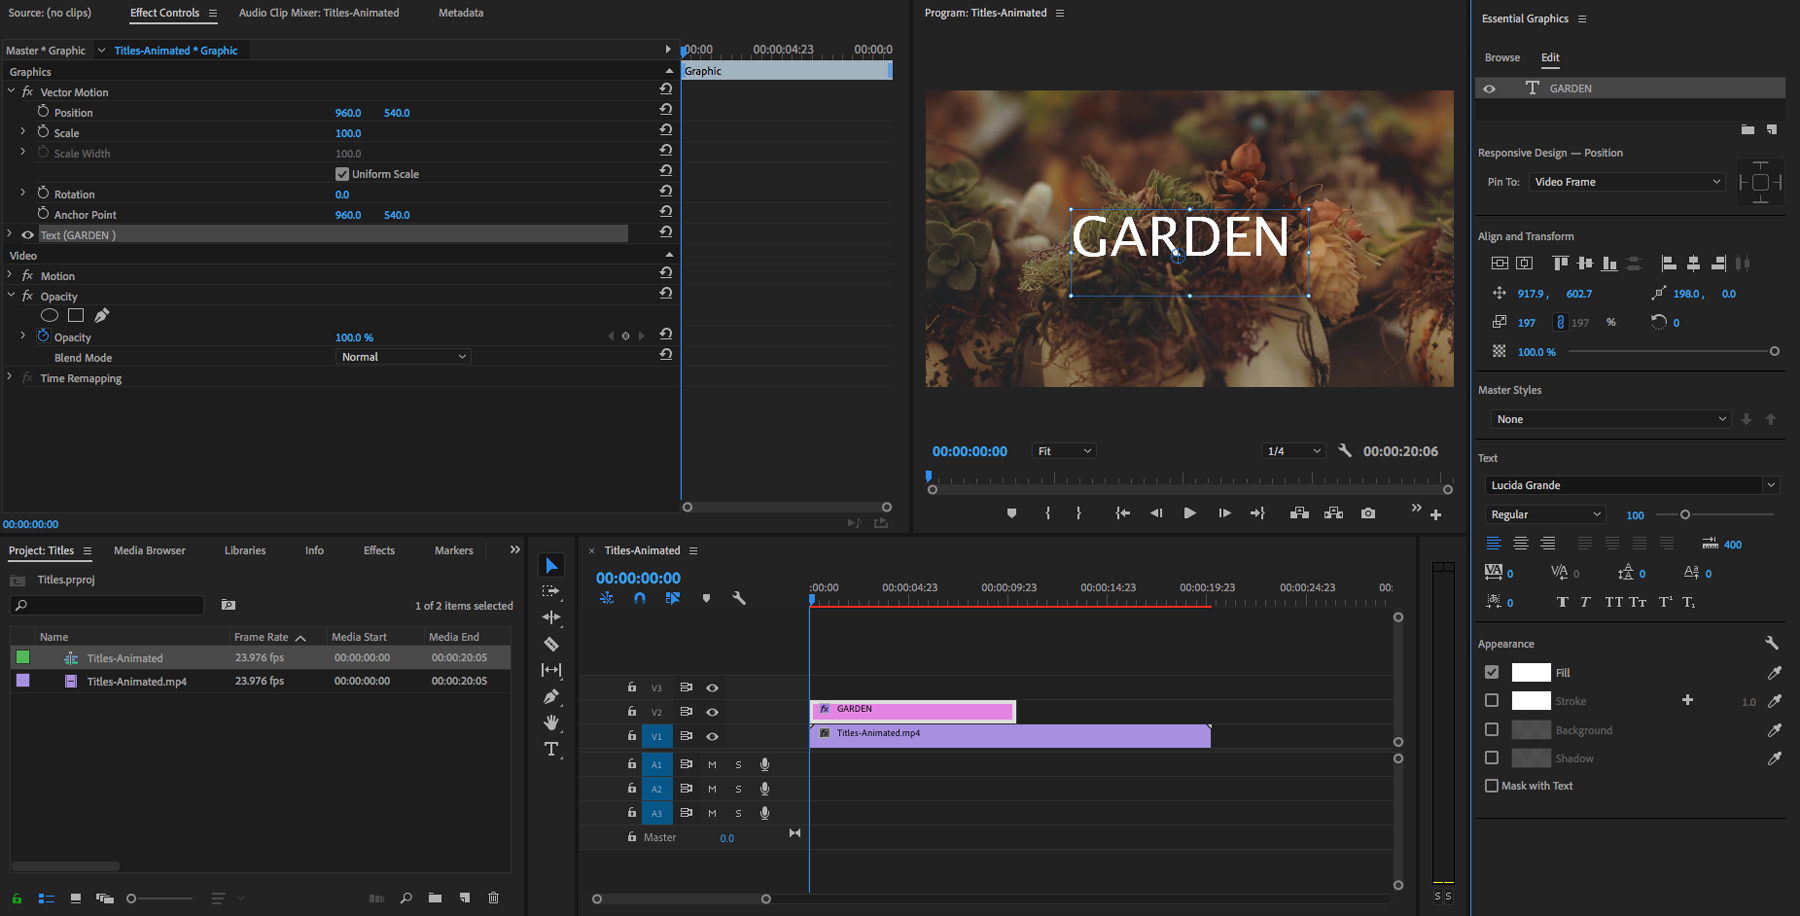
When your text appears as desired, stretch your title track to fill as much time as you’d like on the timeline, then, you’re ready to start animating. Firstly, we’ll create a fade in and out effect.
In the timeline, drag your play-head to the beginning of the title, then in Effect Controls, under fx Opacity, set Opacity to 0% which will automatically drop your first keyframe. Drag the play-head a quarter of the way into the title clip and set Opacity to 100% to drop another keyframe. Dragging ahead to three quarters of the way through the title, click the small diamond to add another 100% opacity keyframe. Finally, with the play-head at the end of the title, set Opacity back to 0% to drop your final keyframe. Hold SHIFT and click all four of your keyframes in the small Effect Controls timeline, then right click and choose Auto Bezier to smooth the fade in and out even more.

This animation looks fine, but we can do more with it, so in the Effects tab of your Project panel, search for Gaussian Blur and when it appears under Video Effects / Blur & Sharpen, drag it onto your title. Now, back in the Effect Controls panel, add more keyframes at the same timestamps as the others. To do this, under fx Gaussian Blur, with the play-head at the beginning of the title, set Blurriness to your desired value, set it to 0% in your two centre positions, then back to your starting value for your final keyframe.
Now, your titles will fade in from a blur, become clear for a few seconds, then fade away to a blur. We’re almost there, but there’s one more step. With the play-head at the start of your titles, return to the Effect Controls and under fx Vector Motion, click Scale, ensuring it’s set to 100. Drag to the end of your title and increase this value marginally to have your title zoom in, or decrease it to zoom out.
That’s it! You’re free to play around with keyframes and animate various effects, but the steps above will give you a nice, subtle starting point.
Click the images to see a larger view


Transparent text
This technique is ideal for a unique and stylised look. The end result will be text that reveals the image underneath with the remainder of the screen filled – the inversion of ordinary text. This can be done in a number of ways and in most editing software.
If you’re using Premiere Pro, add your text as a new layer using the text tool, ensuring your video track isn’t selected before you start. In this instance, you’ll likely want your text to almost completely fill the screen in order to reveal a good amount of your clip underneath.
Now, in the Effects panel, search Track Matte Key and drag it onto your video track. In the Effect Controls panel, find fx Track Matte Key, and in the dropdown menu next to Matte: select the video track you’ve just applied it to. That’s it!
Click the images to see a larger view


You may want to use the keyframe technique above to fade the titles out, or zoom in to one of your letters significantly to fill the frame with your video clip. Also, by default, the background will be black, but you can choose any colour you want by adding a Color Matte to the video track below your video.
If you’re using iMovie, you can create this effect using Keynote, another of Apple’s free apps. Open Keynote, ensure Wide is selected to match the likely aspect ratio of your video and choose the black theme. One inside, adjust your zoom to fit the slide if need be and add your text following the same guidelines as above.
It’s essential to fill your text green, and you can add effects such as zoom or fade under the Build In tab. Keep the length of both your titles and clip they’ll play over in mind. When finished, click File – Export To – Movie… and save your titles in an appropriate place.
Back in iMovie, import the titles, drag them onto your timeline above your video, and with the title track selected, choose Green/Blue Screen in the dropdown menu to the top left of your video preview. This should automatically pick up your green text and make it transparent. If not, select the eraser tool next to Clean-up: and use it to click on part of your text.
If any changes need to be made, they will have to be done back in Keynote, so it’s a good idea to keep a copy of your titles saved.
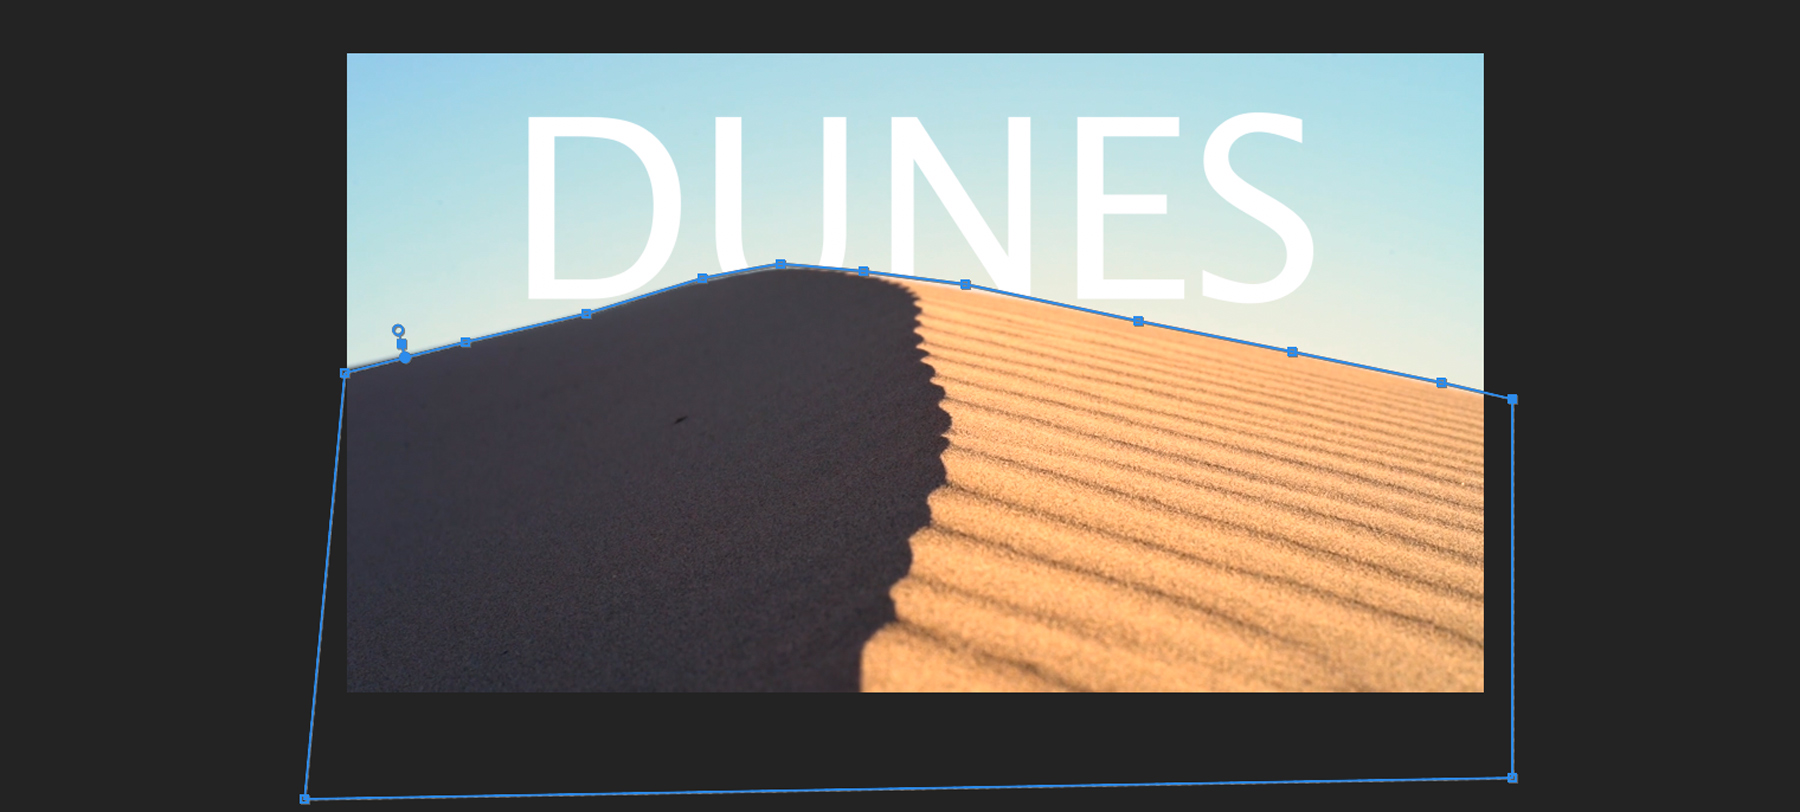
Masked titles
Our third and final technique allows you to blend your video titles with your video and partially hide them behind objects in the frame, almost as if the text were really in your shot. For this, you’ll need a software with masking capabilities. Once again, we’ll be referring to Premiere Pro.
With your clip on the timeline, add your text as a new layer as outlined above. Ensure it’s sized and placed where you want it in relation to the parts of the video you’re going to blend it with. Next, in the Effect Controls panel, reduce the opacity of the text almost entirely so you can see your video clearly. When you do this, be sure the stopwatch icon next to Opacity is not selected – you don’t want to add a keyframe.
Now, with your text track still selected, once again under fx Opacity in the Effect Controls panel, select pen icon to give you control of the Free draw bezier tool. Use the pen to drop points around whatever object you want to appear in front of your titles. If you need a more detailed view, zoom the Program panel, and if your object reaches to the edge of frame, don’t worry, you can drop points outside of it.
Once you’ve completed your selection by joining the last point to the first, you can refine your selection. By holding ALT, a small handle will appear on each point, allowing you to curve the lines of your selection. You can drag existing points to move them or add new ones here, too.
Next, where you reduced it before, return Opacity – not Mask Opacity – to 100%. You’ll see the text will appear within your selection, so simply click Inverted slightly below. Now, your text should be hidden behind your selection.
If you’re using a static shot, you may not have to adjust your selection. If the subject that’s hiding your titles is moving, you certainly will. To do this return to the Effect Controls menu and next to Mask Path, select the Track selected mask forward 1 frame icon. Adjust your mask and repeat as many times as necessary. You may not need to adjust it every frame.
The key to succeeding with this technique is an accurate mask, and ideally, one that doesn’t need to be moved too much – because of both the time it takes to do so and the effect on the final look.
Click the images to see a larger view


We hope you’ll give one or all of these video titles a try – they’re easily done and we’re sure you’ll be pleased with the results.
If you have any questions, you can find us on Instagram, Twitter and Facebook. Don’t forget to sign up to our newsletter! You’ll get our latest news and guides, access to exclusive offers and competitions, and you can even read our full digital issues completely free.