
A beginner’s guide to slow mo video
Posted on Apr 15, 2020 by Lee Renwick
Slow motion is a great skill to have in the arsenal for any videographer. Here’s what you need to know, and how to shoot and edit slow mo video.
What do you shoot? Events and weddings, commercial work, products, music videos, creative personal projects? Whatever it is, some well-placed and well-done slow mo video can go a long way. Get it wrong, though, and you’ll know about it.
Thankfully, it’s really very simple – all you need is an understanding of capture and playback speed, a few shooting tips and some editing know-how. We’ve got all that and more right here.
How does slow motion work?
If you know the practicalities and you just want the shooting and editing tips, feel free to skip this section. If not, this is essential stuff, so stick around.
In short, slow mo video is just the process of playing footage back at a slower frame rate than it was captured. This won’t work with just any footage, though – or it won’t work well, at least. You’ll need to make sure you’re capturing at a fairly fast frame rate.
Some more modern DSLRs and mirrorless cameras have the ability to shoot up to 120fps, but 60fps can still be slowed down nicely. When it comes to playback, 24 or 30fps is common. Let’s use let’s use 120 and 24fps as an example, because the maths works out nicely.
If you record 120 frames in a second, then play that footage back showing 24 frames per second, your clip will take 5 seconds to play, because 120/24 = 5. This is 5x slow-motion.
Though specific numbers will vary, this relationship between capture speed and playback speed can be applied anywhere. It’s as simple as that.
Slow mo video tips
You can’t just crank your camera to 120p and expect good results – there’s a little more to it than that. Thankfully, a few key tips for shooting will see you right.
It’s important to note that recording at higher frame rates may come with a few limitations. Your camera may crop and only use part of the sensor to record, or it may limit you to a lower resolution than its ordinary video capabilities.
Conversely, and without straying too far into broadcast formats, if you’re in a PAL area, which is most of the world outside the United States of America, you may be able to get some extra frames out of your camera by switching your camera to NTSC. Provided you’re editing and playing back on a computer and not a TV, you’re unlikely to notice a difference. With that out of the way, let’s get into some tips.
Our first and most important tip is making sure you keep the 180-degree shutter angle rule in mind. If you’re experienced with normal video, you may have this one covered, but it can be overlooked when jumping between settings. As you would when shooting 24 or 30p, just remember to keep your shutter speed at roughly double your frame rate. Of course, this rule is just a guideline and you’re free to experiment, but keep it in mind. Many find increasing the shutter speed beyond double frame rate produces good results.
With what could be a fairly fast shutter speed, as determined by your frame rate, you’ll likely need a good amount of light. If you’re shooting in artificial light, it’s important to know that some light sources will flicker when captured in slow motion, so that’s our second tip.
As lights flicker in specific frequencies, varying by country, adjusting your frame rate and shutter speed may lessen or get rid of the flickering effect, but it’s best to get some test shots before committing to a shoot, or just shoot using lights designed for video from the get-go.
Our third tip is all about movement. If you’re new to slow mo video, it can be easy to perform the same camera movements you usually would, but you’ve got to consider that your playback could be 5x slower than normal. As such, a normal pan will look snail-paced. What we’re saying is, don’t be afraid to really throw that camera around. The same goes for anything in your shot – it needs to be moving at a decent speed.
We’ve covered visuals, but what about sound? You can stretch an audio clip to match the speed of the video, but there’s a chance it will sound warped and strange. Your camera may not even record audio during high frame rate capture. In either case, for the best results, you’ll likely have to add some effects in post. There’s a world of stock sounds designed just for this, though, so don’t worry.
Finally, but not to be overlooked, don’t be gratuitous with your use of slow motion. It has a time and a place, and when overdone, loses its impact. Similarly, you should know what’s going to be played back in slow mo and what’s not when you’re shooting – don’t just shoot everything in 120p ‘just in case’ you may feel like slowing it down later.
How to edit slow mo video
When you’ve shot your footage, you’re ready to edit. There are a few things you’ll need to know when editing footage with unusual frame rates or different clips with a mix of frame rates, but it’s nothing too complex.
We’ll be referring to Premiere Pro here, but you’ll likely be able to achieve very similar results using other software, though specific commands will vary to some degree.
The first step is setting the playback speed of your sequence. If the first clip you drag in is a 120p clip, your editing software may play all following clips back at this frame rate, and that’s likely not something you want. In Premiere Pro, in New Sequence, simply set your desired playback speed in the Timebase dropdown menu in Settings.
When your timeline is set up, there are two easy ways to go about making your footage play in slow motion. Firstly, you can select all of the clips in your bin, right click, hit Modify, then Interpret Footage, select Assume this frame rate and enter the playback speed as determined by the step above.
Alternately, you can drag your clips onto your timeline, then simply right click, select Speed/Duration and enter a percentage. Once again, remembering the relationship between capture speed and playback speed is important here. Too low a percentage will play the footage slower than your timeline speed, which doesn’t look good. For example, with 120p footage and a 24p timeline, you could play the footage at 20% speed at the lowest. In software such as Final Cut Pro X and iMovie, these settings appear under the speedometer icon.
So, now your footage is on your timeline playing back in slow motion as you wanted, but there’s still more we can do for even better results. Firstly, we can make it look even smoother.
One of the best things about slow mo video is that it looks great straight out of camera – you only need a split second of steady real-time footage for a shot that lasts a few smooth seconds when played back slower. If you want to smooth longer clips, though, in Premiere Pro, open the Effects panel, search Warp Stabilizer, drop it onto clips and let it work its magic. To be clear, this won’t work perfectly on extremely shaky footage, and it does perform a small crop.
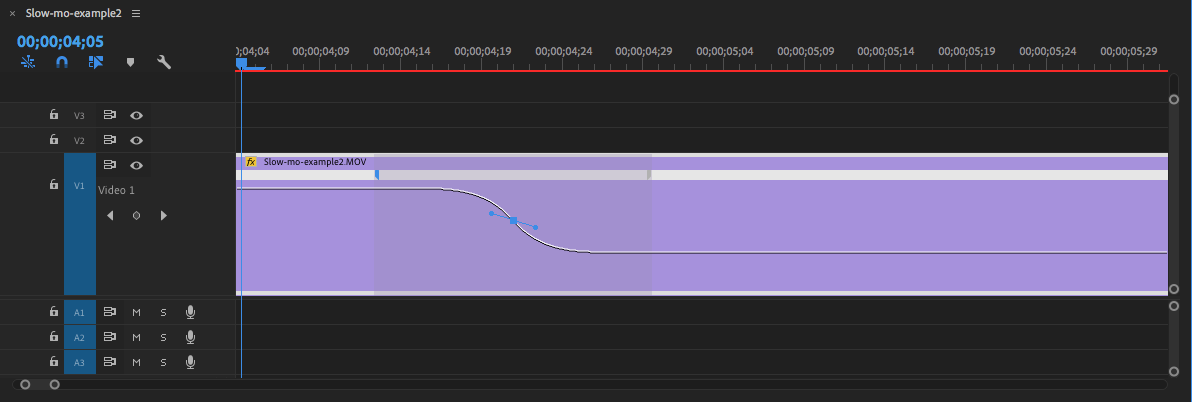
Our final editing tip offers you more control within clips, thanks to what’s known as speed ramping. If you only want a small section of your clip to play in slow motion, there’s no need for any complex editing you just need to follow these basic steps.
Firstly, stretch your track upwards and zoom so it fills all or most of the visible timeline. Next, right click on the small FX tab on the clip, select Time Remapping and Speed, then, using the pen tool, click to drop a key frame where you want your slow mo to start or end. Now, drag the line that runs through the clip – this represents speed – up to whatever percentage is normal playback speed. Again, with a 120p clip on a 24p timeline, this would be 500%, based on the capture speed and playback speed relationship mentioned throughout.
Remember, whatever side of the key frame you drag upwards will be the section that plays in real time. You can create a second point and drag the line back down if you want the speed to slow down momentarily, then ramp back up. You can also adjust how quickly the speed ramps in a number of ways. You can drag the ramp left or right to have it happen over a greater number of frames, or you can click and rotate the blue tabs to smooth the increase or decrease in speed.
Again, a similar result can be achieved in other software. Even in very basic editing platforms, you can simply cut your clip into sections and adjust the speed of just one section, though there won’t be a smooth ramp.
And there you have it, just about all you’ll ever need to know about understanding, shooting and editing slow mo video.
If you have any questions, you can find us on Instagram, Twitter and Facebook. Don’t forget to sign up to our newsletter! You’ll get our latest news and guides, access to exclusive offers and competitions, and you can even read our full digital issues completely free.